# Create your first video stream
> Create a video asset and receive its playback URL with a webhook.
Set up a playback webhook, create a Source from a hosted video, turn it into a video asset, and play it. Chunkify notifies your server when the stream is playable.
## Before you begin
You will need a Project access token from **Developers → API tokens**, and a direct HTTP or HTTPS URL for a video file that Chunkify can access. Replace `My Project Access Token` in the examples with your token.
This guide uses public preview playback. Keep **Enable public preview** on in **Video streaming → Settings**. If your Project already has storage and CDN delivery configured, you can use the video asset's `cdn_url` instead.
To make API requests, install one of our [SDKs](/docs/integration/sdk):
<tabs>
<tab title="Typescript">
```sh
npm install @chunkify/chunkify
```
</tab>
<tab title="Python">
```sh
pip install chunkify-sdk
```
</tab>
<tab title="PHP">
```sh
composer require chunkify/chunkify-php
```
</tab>
<tab title="Go">
```sh
go get github.com/chunkifydev/chunkify-go
```
</tab>
</tabs>
## Set up your webhooks
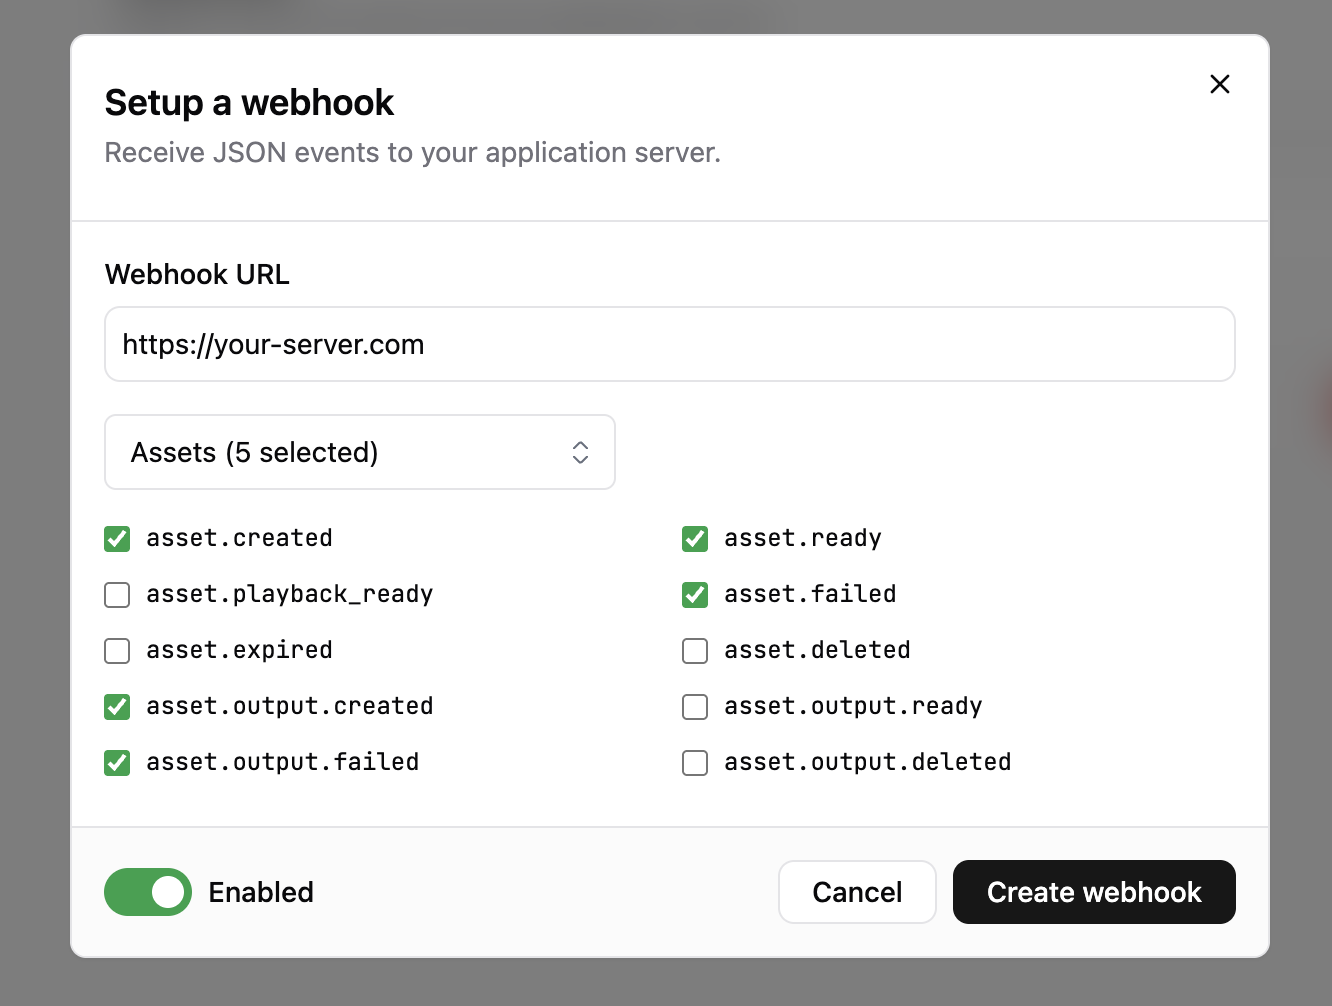
Set up your webhook before creating the video asset. In your Project, go to **Developers → Webhooks → Setup webhook**. Enter a URL for your server's webhook endpoint, select `asset.playback_ready`, then create the webhook. Copy its secret for your server.
<a href="/docs/assets/images/webhooks/setup-webhook.png"><img src="/docs/assets/images/webhooks/setup-webhook.png" alt="Webhook setup dialog with Asset events selected and delivery enabled" width="600"/></a>
Implement a POST handler using the example below and start your server before creating the video asset. For local testing, you can use the [Chunkify CLI](/docs/cli/integration#receiving-webhooks-notifications-locally) to create a temporary webhook and forward notifications to your server at a localhost URL. That guide also shows how to get the webhook secret.
The webhook handler runs separately from the Source and video asset creation code further below. This example show its SDK import and the relevant lines of a POST handler. See the [webhook guide](/docs/integration/webhooks#verify-webhook-signature) for complete server examples.
<codegroup>
<codeblock lang="Typescript">
```typescript
import Chunkify from '@chunkify/chunkify';

// Inside an Express POST /webhook handler using express.raw({ type: 'application/json' })
const rawBody = req.body.toString('utf8');
const headers = {
  'webhook-id': req.header('webhook-id') ?? '',
  'webhook-timestamp': req.header('webhook-timestamp') ?? '',
  'webhook-signature': req.header('webhook-signature') ?? '',
};

const webhookClient = new Chunkify({ webhookKey: 'Your webhook secret' });
let notification: Chunkify.UnwrapWebhookEvent;
try {
  notification = webhookClient.webhooks.unwrap(rawBody, { headers });
} catch {
  res.sendStatus(400);
  return;
}

if (notification.event === 'asset.playback_ready') {
  const { asset } =
    notification.data as Chunkify.UnwrapWebhookEvent.NotificationPayloadAsset;
  if (asset.preview_url) console.log('Preview URL:', asset.preview_url);
  if (asset.cdn_url) console.log('CDN URL:', asset.cdn_url);
}
res.sendStatus(200);
```
</codeblock>
<codeblock lang="Python">
```python
from chunkify import Chunkify

# Inside BaseHTTPRequestHandler.do_POST
raw_body = self.rfile.read(int(self.headers.get("Content-Length", 0))).decode("utf-8")
headers = {
    "webhook-id": self.headers.get("webhook-id", ""),
    "webhook-timestamp": self.headers.get("webhook-timestamp", ""),
    "webhook-signature": self.headers.get("webhook-signature", ""),
}

webhook_client = Chunkify(webhook_key="Your webhook secret")
try:
    notification = webhook_client.webhooks.unwrap(raw_body, headers=headers)
except Exception:
    self.send_response(400)
    self.end_headers()
    return

if notification.event == "asset.playback_ready":
    asset = notification.data.asset
    if asset.preview_url:
        print("Preview URL:", asset.preview_url)
    if asset.cdn_url:
        print("CDN URL:", asset.cdn_url)

self.send_response(200)
self.end_headers()
```
</codeblock>
<codeblock lang="PHP">
```php
<?php

use Chunkify\Client;

require __DIR__ . '/vendor/autoload.php';

$rawBody = file_get_contents('php://input') ?: '';
$requestHeaders = array_change_key_case(getallheaders() ?: [], CASE_LOWER);
$headers = [
    'webhook-id' => $requestHeaders['webhook-id'] ?? '',
    'webhook-timestamp' => $requestHeaders['webhook-timestamp'] ?? '',
    'webhook-signature' => $requestHeaders['webhook-signature'] ?? '',
];

$webhookClient = new Client(webhookKey: 'Your webhook secret');
try {
    $notification = $webhookClient->webhooks->unwrap($rawBody, $headers);
} catch (\Chunkify\Core\Exceptions\WebhookException $error) {
    http_response_code(400);
    exit;
}

if ($notification->event === 'asset.playback_ready') {
    $asset = $notification->data->asset;
    if ($asset->previewURL) {
        error_log('Preview URL: ' . $asset->previewURL);
    }
    if ($asset->cdnURL) {
        error_log('CDN URL: ' . $asset->cdnURL);
    }
}
http_response_code(200);
echo 'OK';
```
</codeblock>
<codeblock lang="Go">
```go
import (
	"fmt"
	"io"
	"net/http"

	"github.com/chunkifydev/chunkify-go"
	"github.com/chunkifydev/chunkify-go/option"
)

// Inside func handleWebhook(w http.ResponseWriter, r *http.Request)
rawBody, err := io.ReadAll(r.Body)
if err != nil {
	http.Error(w, "Could not read webhook", http.StatusBadRequest)
	return
}

webhookClient := chunkify.NewClient(option.WithWebhookKey("Your webhook secret"))
notification, err := webhookClient.Webhooks.Unwrap(rawBody, r.Header)
if err != nil {
	http.Error(w, "Invalid webhook", http.StatusBadRequest)
	return
}

if notification.Event == chunkify.UnwrapWebhookEventEventAssetPlaybackReady {
	asset := notification.Data.AsUnwrapWebhookEventDataNotificationPayloadAsset().Asset
	if asset.PreviewURL != "" {
		fmt.Println("Preview URL:", asset.PreviewURL)
	}
	if asset.CdnURL != "" {
		fmt.Println("CDN URL:", asset.CdnURL)
	}
}
w.WriteHeader(http.StatusOK)
```
</codeblock>
</codegroup>
## Add a source
Create a Source from a hosted video file URL:
<codegroup>
<codeblock lang="Typescript">
```typescript
import Chunkify from '@chunkify/chunkify';

const client = new Chunkify({
  projectAccessToken: 'My Project Access Token',
});

const source = await client.sources.create({
  url: 'https://example.com/path/to/video.mp4',
});

console.log('Source ID:', source.id);
```
</codeblock>
<codeblock lang="Python">
```python
from chunkify import Chunkify

client = Chunkify(
    project_access_token="My Project Access Token",
)

source = client.sources.create(
    url="https://example.com/path/to/video.mp4",
)

print("Source ID:", source.id)
```
</codeblock>
<codeblock lang="PHP">
```php
<?php

use Chunkify\Client;

require __DIR__ . '/vendor/autoload.php';

$client = new Client(
    projectAccessToken: 'My Project Access Token',
);

$source = $client->sources->create(
    url: 'https://example.com/path/to/video.mp4',
);

echo 'Source ID: ' . $source->id . PHP_EOL;
```
</codeblock>
<codeblock lang="Go">
```go
import (
	"context"
	"fmt"

	"github.com/chunkifydev/chunkify-go"
	"github.com/chunkifydev/chunkify-go/option"
)

ctx := context.Background()
client := chunkify.NewClient(
	option.WithProjectAccessToken("My Project Access Token"),
)

source, err := client.Sources.New(ctx, chunkify.SourceNewParams{
	URL: "https://example.com/path/to/video.mp4",
})
if err != nil {
	panic(err)
}

fmt.Println("Source ID:", source.ID)
```
</codeblock>
</codegroup>
Keep the original file accessible while Chunkify prepares the video asset. Later you can also check how to create a Source from a [storage or an upload](/docs/integration/video-upload).
## Create a video asset
Pass the Source ID, obtained in the section just above, to Chunkify to create the video asset.
<warning>
Regarding output files:
This request uses the Project's default storage. If that is Chunkify temporary storage, files are deleted after 24 hours.
Use the public `preview_url` to test playback. For production, [connect your storage](/docs/video-streaming/storage) and [configure CDN delivery](/docs/video-streaming/storage/cdn-delivery), then use the video asset's `cdn_url`.
</warning>
<codegroup>
<codeblock lang="Typescript">
```typescript
const asset = await client.assets.create({
  source_id: source.id,
});

console.log('Video asset ID:', asset.id);
```
</codeblock>
<codeblock lang="Python">
```python
asset = client.assets.create(
    source_id=source.id,
)

print("Video asset ID:", asset.id)
```
</codeblock>
<codeblock lang="PHP">
```php
$asset = $client->assets->create(
    sourceID: $source->id,
);

echo 'Video asset ID: ' . $asset->id . PHP_EOL;
```
</codeblock>
<codeblock lang="Go">
```go
asset, err := client.Assets.New(ctx, chunkify.AssetNewParams{
	SourceID: source.ID,
})
if err != nil {
	panic(err)
}

fmt.Println("Video asset ID:", asset.ID)
```
</codeblock>
</codegroup>
Chunkify starts preparing the initial playback stream.
## Receive the playback URL
Chunkify sends `asset.playback_ready` as soon as the initial HLS stream can play, even while the video asset is `preparing`. The poster and timeline previews may become available later, at `asset.ready`.
The handler in [Set up your webhooks](#set-up-your-webhooks) logs the video asset's `preview_url` and, if CDN delivery is configured, its `cdn_url`.
## Play the video
The `preview_url` works with any player that supports HLS. The example below uses Chunkify Player.
Load Chunkify Player in your page and replace `PREVIEW_URL` with the preview URL from the webhook. If you have configured storage and CDN delivery, use the CDN URL for ongoing playback:
```html
<script type="module" src="https://cdn.jsdelivr.net/npm/@chunkify/
[email protected]/+esm"></script>
<chunkify-player
src="PREVIEW_URL"
crossorigin="anonymous"
controls
playsinline
></chunkify-player>
```
## Next steps
- [Storage and delivery](/docs/video-streaming/storage) explains how to connect your storage and CDN for ongoing playback.
- [Workflows](/docs/video-streaming/asset-workflow) let you define which static renditions and captions you want added to your video stream.
- [Webhooks](/docs/integration/webhooks) covers notifications to your server when events occur.