Connect a Cloudflare R2 bucket for source uploads and video outputs.
Connect a Cloudflare R2 bucket to keep uploaded source videos and generated video files in your own storage. You can use the same connection for video assets and transcoding jobs. For ongoing video playback, serve the bucket through a Cloudflare custom domain.
Choose how to connect
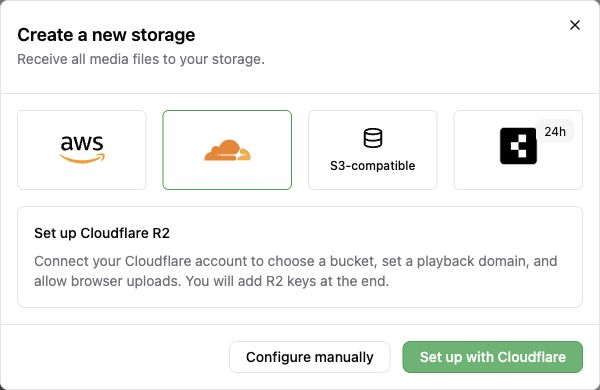
Set up with Cloudflare: Choose or create a bucket in the Chunkify dashboard. Chunkify connects a playback domain and configures browser access before you add R2 access keys. This path is available to Team owners.
Configure manually: Start with an existing R2 bucket, then enter its endpoint and access keys in Chunkify. Configure its playback domain and CORS policy in Cloudflare yourself.
The bucket must have R2 enabled in its Cloudflare account. Choose a Chunkify processing location close to the bucket when the dashboard asks for one. Chunkify currently connects to R2 buckets with the standard account endpoint; jurisdiction-specific R2 endpoints are not supported.
Connecting a playback domain makes the objects in that R2 bucket publicly accessible at their URLs, including source videos stored there. Use a separate bucket for private sources if needed. Cloudflare's r2.dev URL is intended for development traffic; use a custom domain for ongoing playback. See Cloudflare's public bucket guide.
Create R2 access keys
In Cloudflare, open Storage & databases → R2 → Overview → Manage API Tokens. Create an account or user API token with Object Read & Write access, scoped to the bucket you will connect. Copy its Access Key ID and Secret Access Key; Cloudflare shows the secret only once. For guided setup with a new bucket, create this token after Chunkify has created the bucket. See Cloudflare's S3 API credential steps.
Connect the bucket with the Chunkify dashboard
In your Project, open Project settings → Storage, select New storage, then choose Cloudflare R2.
Set up with Cloudflare
Select Set up with Cloudflare and authorize the Cloudflare account that holds your domain and, if you have one, your existing R2 bucket.
Select an existing bucket or enter a name for a new one. Choose a playback subdomain on a domain in the same Cloudflare account. Add the URLs of websites that will upload or play videos.
Review the proposed changes, including the full R2 CORS policy, then select Apply these changes. Chunkify creates the bucket if needed, attaches the playback domain, configures segment caching, and adds browser access rules while preserving existing CORS rules.
Create an Object Read & Write R2 token scoped to that bucket. Enter its access key and secret key in Chunkify. Keep the suggested Output prefixchunkify/, or enter another prefix. Enable Set this storage as default if new uploads and outputs should use it, then select Connect.
The guided setup records the playback domain as the connection's CDN base URL. The connection check confirms that Chunkify can write, inspect, and read an object. It does not confirm that your website can play video from the domain.
Configure manually
Create an R2 bucket or select an existing one. Note its name and your Cloudflare account ID.
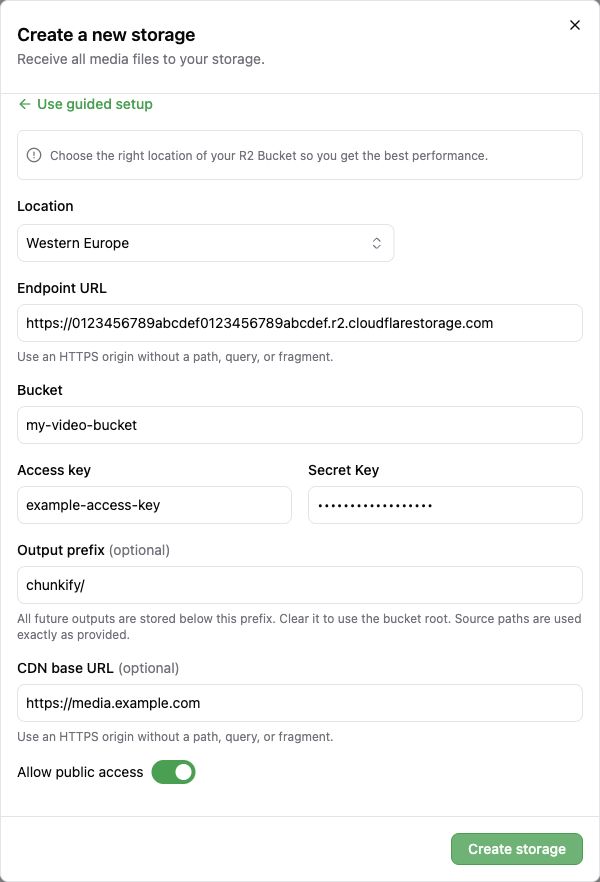
In the Chunkify storage form, select a Location close to the bucket. Enter the Endpoint URL as https://<ACCOUNT_ID>.r2.cloudflarestorage.com, followed by the bucket name and R2 access keys. The endpoint is the S3 API endpoint, not the bucket's public playback domain. Cloudflare documents this endpoint format.
Keep the suggested Output prefixchunkify/, or enter another prefix. If you already have a custom playback domain attached to the bucket, enter its HTTPS origin as the CDN base URL, such as https://media.example.com. Turn on Allow public access only if objects are publicly readable through that domain; this switch does not change Cloudflare permissions.
Select Create storage. Chunkify checks that it can write, inspect, and read an object under the output prefix. To make this the Project default afterward, edit the connection, enable Use as default storage, and save.
For manual setup, follow the Cloudflare CDN guide to attach a playback domain and configure caching. The domain must serve object keys from the bucket root, including the output prefix.
Connect with an SDK
Create the connection with a Project access token. The R2 region is always auto; location selects where Chunkify processes the video. These examples create a private connection; add a CDN base URL after you attach a playback domain. Replace the example account ID, bucket, credentials, and Project ID with yours. The second call makes this the Project default for new uploads and video outputs. Omit that call if you will select this storage individually; updating the Project requires a Team access token.
importChunkifyfrom'@chunkify/chunkify';constclient=newChunkify({projectAccessToken:'My Project Access Token',});conststorage=awaitclient.storages.create({storage:{provider:'cloudflare',region:'auto',location:'EU',bucket:'my-video-bucket',endpoint:'https://0123456789abcdef0123456789abcdef.r2.cloudflarestorage.com',access_key_id:'My R2 Access Key ID',secret_access_key:'My R2 Secret Access Key',base_prefix:'chunkify/',public:false,},});// Optional: use this storage as the Project default.
constteamClient=newChunkify({teamAccessToken:'My Team Access Token',});awaitteamClient.projects.update('project_id',{storage_id: storage.id,});
fromchunkifyimportChunkifyclient=Chunkify(project_access_token="My Project Access Token")storage=client.storages.create(storage={"provider":"cloudflare","region":"auto","location":"EU","bucket":"my-video-bucket","endpoint":"https://0123456789abcdef0123456789abcdef.r2.cloudflarestorage.com","access_key_id":"My R2 Access Key ID","secret_access_key":"My R2 Secret Access Key","base_prefix":"chunkify/","public":False,},)# Optional: use this storage as the Project default.team_client=Chunkify(team_access_token="My Team Access Token")team_client.projects.update(project_id="project_id",storage_id=storage.id,)
<?phpuseChunkify\Client;$client=newClient(projectAccessToken:'My Project Access Token');$storage=$client->storages->create(storage:['provider'=>'cloudflare','region'=>'auto','location'=>'EU','bucket'=>'my-video-bucket','endpoint'=>'https://0123456789abcdef0123456789abcdef.r2.cloudflarestorage.com','accessKeyID'=>'My R2 Access Key ID','secretAccessKey'=>'My R2 Secret Access Key','basePrefix'=>'chunkify/','public'=>false,]);// Optional: use this storage as the Project default.
$teamClient=newClient(teamAccessToken:'My Team Access Token');$teamClient->projects->update('project_id',storageID:$storage->id,);
import("context""github.com/chunkifydev/chunkify-go""github.com/chunkifydev/chunkify-go/option")ctx:=context.Background()client:=chunkify.NewClient(option.WithProjectAccessToken("My Project Access Token"),)storage,err:=client.Storages.New(ctx,chunkify.StorageNewParams{OfCloudflare:&chunkify.StorageNewParamsStorageCloudflare{Location:"EU",Bucket:"my-video-bucket",Endpoint:"https://0123456789abcdef0123456789abcdef.r2.cloudflarestorage.com",AccessKeyID:"My R2 Access Key ID",SecretAccessKey:"My R2 Secret Access Key",BasePrefix:chunkify.String("chunkify/"),Public:chunkify.Bool(false),},})iferr!=nil{panic(err)}// Optional: use this storage as the Project default.
teamClient:=chunkify.NewClient(option.WithTeamAccessToken("My Team Access Token"),)err=teamClient.Projects.Update(ctx,"project_id",chunkify.ProjectUpdateParams{StorageID:chunkify.String(storage.ID),})iferr!=nil{panic(err)}
Configure browser access
Browser uploads go directly to R2 using a signed PUT URL. The bucket's CORS policy must allow PUT and the Content-Type request header from each website that hosts the uploader.
Playback requests go to the R2 custom domain, using GET or HEAD and sometimes a Range header. The bucket's CORS policy also controls the response headers returned through that domain, so it must allow the viewing website's origin and playback requests.
The guided setup adds one bucket rule for both uses, including your app URLs and https://chunkify.dev. For manual setup, open the bucket's Settings → CORS policy in Cloudflare and merge the upload and playback rules with any rules already there. Cloudflare's R2 CORS guide shows the policy format and custom domain behavior. If the domain has cached responses from before a CORS change, purge them so the new headers appear.
Check the setup
Chunkify checks R2 access when you create the connection. To confirm the output location, create a small video asset and inspect the files under your output prefix. Test browser uploads if you use them, and play the video from your website through the custom domain. Check the HLS stream, poster, and timeline previews. The CORS guide and CDN delivery guide cover those browser checks.
You can later edit the connection's output prefix, CDN base URL, and credentials under Project settings → Storage. Changing the prefix does not move existing files. See the storage overview before changing a connection that already holds video files.
# Cloudflare R2
> Connect a Cloudflare R2 bucket for source uploads and video outputs.
Connect a Cloudflare R2 bucket to keep uploaded source videos and generated video files in your own storage. You can use the same connection for video assets and transcoding jobs. For ongoing video playback, serve the bucket through a [Cloudflare custom domain](https://developers.cloudflare.com/r2/buckets/public-buckets/#custom-domains).
## Choose how to connect
- **Set up with Cloudflare**: Choose or create a bucket in the Chunkify dashboard. Chunkify connects a playback domain and configures browser access before you add R2 access keys. This path is available to Team owners.
- **Configure manually**: Start with an existing R2 bucket, then enter its endpoint and access keys in Chunkify. Configure its playback domain and CORS policy in Cloudflare yourself.
The bucket must have R2 enabled in its Cloudflare account. Choose a Chunkify processing location close to the bucket when the dashboard asks for one. Chunkify currently connects to R2 buckets with the standard account endpoint; jurisdiction-specific R2 endpoints are not supported.
<note>
Connecting a playback domain makes the objects in that R2 bucket publicly accessible at their URLs, including source videos stored there. Use a separate bucket for private sources if needed. Cloudflare's `r2.dev` URL is intended for development traffic; use a custom domain for ongoing playback. See [Cloudflare's public bucket guide](https://developers.cloudflare.com/r2/buckets/public-buckets/).
</note>
## Create R2 access keys
In Cloudflare, open **Storage & databases → R2 → Overview → Manage API Tokens**. Create an account or user API token with **Object Read & Write** access, scoped to the bucket you will connect. Copy its **Access Key ID** and **Secret Access Key**; Cloudflare shows the secret only once. For guided setup with a new bucket, create this token after Chunkify has created the bucket. See [Cloudflare's S3 API credential steps](https://developers.cloudflare.com/r2/get-started/s3/#2-generate-api-credentials).
## Connect the bucket with the Chunkify dashboard
In your Project, open **Project settings → Storage**, select **New storage**, then choose **Cloudflare R2**.
<a href="/docs/assets/images/storage/cloudflare-r2-setup-options.jpg"><img src="/docs/assets/images/storage/cloudflare-r2-setup-options.jpg" alt="Cloudflare R2 selected in the storage dialog with Set up with Cloudflare and Configure manually options" width="480"/></a>
### Set up with Cloudflare
1. Select **Set up with Cloudflare** and authorize the Cloudflare account that holds your domain and, if you have one, your existing R2 bucket.
2. Select an existing bucket or enter a name for a new one. Choose a playback subdomain on a domain in the same Cloudflare account. Add the URLs of websites that will upload or play videos.
3. Review the proposed changes, including the full R2 CORS policy, then select **Apply these changes**. Chunkify creates the bucket if needed, attaches the playback domain, configures segment caching, and adds browser access rules while preserving existing CORS rules.
4. Create an **Object Read & Write** R2 token scoped to that bucket. Enter its access key and secret key in Chunkify. Keep the suggested **Output prefix** `chunkify/`, or enter another prefix. Enable **Set this storage as default** if new uploads and outputs should use it, then select **Connect**.
The guided setup records the playback domain as the connection's CDN base URL. The connection check confirms that Chunkify can write, inspect, and read an object. It does not confirm that your website can play video from the domain.
### Configure manually
1. [Create an R2 bucket](https://developers.cloudflare.com/r2/buckets/create-buckets/) or select an existing one. Note its name and your Cloudflare account ID.
2. In the Chunkify storage form, select a **Location** close to the bucket. Enter the **Endpoint URL** as `https://<ACCOUNT_ID>.r2.cloudflarestorage.com`, followed by the bucket name and R2 access keys. The endpoint is the S3 API endpoint, not the bucket's public playback domain. Cloudflare documents this [endpoint format](https://developers.cloudflare.com/r2/get-started/s3/#2-generate-api-credentials).
3. Keep the suggested **Output prefix** `chunkify/`, or enter another prefix. If you already have a custom playback domain attached to the bucket, enter its HTTPS origin as the **CDN base URL**, such as `https://media.example.com`. Turn on **Allow public access** only if objects are publicly readable through that domain; this switch does not change Cloudflare permissions.
4. Select **Create storage**. Chunkify checks that it can write, inspect, and read an object under the output prefix. To make this the Project default afterward, edit the connection, enable **Use as default storage**, and save.
<a href="/docs/assets/images/storage/cloudflare-r2-manual-setup.jpg"><img src="/docs/assets/images/storage/cloudflare-r2-manual-setup.jpg" alt="Cloudflare R2 manual connection form with example location, endpoint, bucket, access keys, output prefix, CDN base URL, and public access enabled" width="480"/></a>
For manual setup, follow the [Cloudflare CDN guide](/docs/video-streaming/storage/cloudflare) to attach a playback domain and configure caching. The domain must serve object keys from the bucket root, including the output prefix.
## Connect with an SDK
Create the connection with a Project access token. The R2 `region` is always `auto`; `location` selects where Chunkify processes the video. These examples create a private connection; add a CDN base URL after you attach a playback domain. Replace the example account ID, bucket, credentials, and Project ID with yours. The second call makes this the Project default for new uploads and video outputs. Omit that call if you will select this storage individually; updating the Project requires a Team access token.
<codegroup>
<codeblock lang="Typescript">
```typescript
import Chunkify from '@chunkify/chunkify';

const client = new Chunkify({
  projectAccessToken: 'My Project Access Token',
});

const storage = await client.storages.create({
  storage: {
    provider: 'cloudflare',
    region: 'auto',
    location: 'EU',
    bucket: 'my-video-bucket',
    endpoint: 'https://0123456789abcdef0123456789abcdef.r2.cloudflarestorage.com',
    access_key_id: 'My R2 Access Key ID',
    secret_access_key: 'My R2 Secret Access Key',
    base_prefix: 'chunkify/',
    public: false,
  },
});

// Optional: use this storage as the Project default.
const teamClient = new Chunkify({
  teamAccessToken: 'My Team Access Token',
});

await teamClient.projects.update('project_id', {
  storage_id: storage.id,
});
```
</codeblock>
<codeblock lang="Python">
```python
from chunkify import Chunkify

client = Chunkify(project_access_token="My Project Access Token")

storage = client.storages.create(
    storage={
        "provider": "cloudflare",
        "region": "auto",
        "location": "EU",
        "bucket": "my-video-bucket",
        "endpoint": "https://0123456789abcdef0123456789abcdef.r2.cloudflarestorage.com",
        "access_key_id": "My R2 Access Key ID",
        "secret_access_key": "My R2 Secret Access Key",
        "base_prefix": "chunkify/",
        "public": False,
    },
)

# Optional: use this storage as the Project default.
team_client = Chunkify(team_access_token="My Team Access Token")
team_client.projects.update(
    project_id="project_id",
    storage_id=storage.id,
)
```
</codeblock>
<codeblock lang="PHP">
```php
<?php

use Chunkify\Client;

$client = new Client(projectAccessToken: 'My Project Access Token');

$storage = $client->storages->create(storage: [
    'provider' => 'cloudflare',
    'region' => 'auto',
    'location' => 'EU',
    'bucket' => 'my-video-bucket',
    'endpoint' => 'https://0123456789abcdef0123456789abcdef.r2.cloudflarestorage.com',
    'accessKeyID' => 'My R2 Access Key ID',
    'secretAccessKey' => 'My R2 Secret Access Key',
    'basePrefix' => 'chunkify/',
    'public' => false,
]);

// Optional: use this storage as the Project default.
$teamClient = new Client(teamAccessToken: 'My Team Access Token');
$teamClient->projects->update(
    'project_id',
    storageID: $storage->id,
);
```
</codeblock>
<codeblock lang="Go">
```go
import (
    "context"

    "github.com/chunkifydev/chunkify-go"
    "github.com/chunkifydev/chunkify-go/option"
)

ctx := context.Background()
client := chunkify.NewClient(
    option.WithProjectAccessToken("My Project Access Token"),
)

storage, err := client.Storages.New(ctx, chunkify.StorageNewParams{
    OfCloudflare: &chunkify.StorageNewParamsStorageCloudflare{
        Location: "EU",
        Bucket: "my-video-bucket",
        Endpoint: "https://0123456789abcdef0123456789abcdef.r2.cloudflarestorage.com",
        AccessKeyID: "My R2 Access Key ID",
        SecretAccessKey: "My R2 Secret Access Key",
        BasePrefix: chunkify.String("chunkify/"),
        Public: chunkify.Bool(false),
    },
})
if err != nil {
    panic(err)
}

// Optional: use this storage as the Project default.
teamClient := chunkify.NewClient(
    option.WithTeamAccessToken("My Team Access Token"),
)
err = teamClient.Projects.Update(ctx, "project_id", chunkify.ProjectUpdateParams{
    StorageID: chunkify.String(storage.ID),
})
if err != nil {
    panic(err)
}
```
</codeblock>
</codegroup>
## Configure browser access
**Browser uploads go directly to R2** using a signed `PUT` URL. The bucket's CORS policy must allow `PUT` and the `Content-Type` request header from each website that hosts the uploader.
**Playback requests go to the R2 custom domain**, using `GET` or `HEAD` and sometimes a `Range` header. The bucket's CORS policy also controls the response headers returned through that domain, so it must allow the viewing website's origin and playback requests.
The guided setup adds one bucket rule for both uses, including your app URLs and `https://chunkify.dev`. For manual setup, open the bucket's **Settings → CORS policy** in Cloudflare and merge the [upload and playback rules](/docs/video-streaming/storage/cors) with any rules already there. Cloudflare's [R2 CORS guide](https://developers.cloudflare.com/r2/buckets/cors/) shows the policy format and custom domain behavior. If the domain has cached responses from before a CORS change, purge them so the new headers appear.
## Check the setup
Chunkify checks R2 access when you create the connection. To confirm the output location, create a small video asset and inspect the files under your output prefix. Test browser uploads if you use them, and play the video from your website through the custom domain. Check the HLS stream, poster, and timeline previews. The [CORS guide](/docs/video-streaming/storage/cors) and [CDN delivery guide](/docs/video-streaming/storage/cdn-delivery) cover those browser checks.
You can later edit the connection's output prefix, CDN base URL, and credentials under **Project settings → Storage**. Changing the prefix does not move existing files. See the [storage overview](/docs/video-streaming/storage) before changing a connection that already holds video files.