Amazon S3
Connect an Amazon S3 bucket for source uploads and video outputs.
Connect an Amazon S3 bucket to keep uploaded source videos and generated video files in your own storage. You can use the same connection for video assets and transcoding jobs. To play video assets from this bucket on your website, you also need a CDN.
Prepare your bucket
Use an existing S3 bucket or create one in AWS. Note its name and Region. Check that the Region appears in Chunkify's Region list, then select the matching value.
Give Chunkify bucket access
Create an IAM user with an access key for the connection. Attach this policy to that user. It allows outputs under chunkify/ and optionally supports source files under incoming/. Replace YOUR_BUCKET and adjust the prefixes to match your bucket:
{
  "Version": "2012-10-17",
  "Statement": [
    {
      "Sid": "ListChunkifyOutputs",
      "Effect": "Allow",
      "Action": "s3:ListBucket",
      "Resource": "arn:aws:s3:::YOUR_BUCKET",
      "Condition": {
        "StringLike": { "s3:prefix": "chunkify/*" }
      }
    },
    {
      "Sid": "ManageChunkifyOutputs",
      "Effect": "Allow",
      "Action": [
        "s3:PutObject",
        "s3:GetObject",
        "s3:DeleteObject",
        "s3:DeleteObjectVersion",
        "s3:ListMultipartUploadParts",
        "s3:AbortMultipartUpload"
      ],
      "Resource": "arn:aws:s3:::YOUR_BUCKET/chunkify/*"
    },
    {
      "Sid": "UploadAndReadSources",
      "Effect": "Allow",
      "Action": [
        "s3:PutObject",
        "s3:GetObject",
        "s3:ListMultipartUploadParts",
        "s3:AbortMultipartUpload"
      ],
      "Resource": "arn:aws:s3:::YOUR_BUCKET/incoming/*"
    }
  ]
}
Chunkify uses these permissions to write and read outputs, check the connection, and clean up files when requested. The connection check writes an object under chunkify/chunkify-validation/, reads it, and attempts to remove it. s3:GetObject also permits S3 HEAD requests. s3:DeleteObjectVersion lets the check remove its probe from a versioned bucket. AWS documents the S3 actions and their permissions.
The incoming/ statement is needed only when source videos use that prefix. For how an application chooses a source object key, see Video upload.
For multipart uploads, s3:ListMultipartUploadParts lets Chunkify check uploaded parts before completing the file. s3:AbortMultipartUpload allows it to stop an incomplete upload if setup fails.
If the bucket and access key belong to different AWS accounts, the bucket policy must allow the IAM user. If the bucket uses default SSE-KMS encryption, that user also needs kms:GenerateDataKey and kms:Decrypt access to the key. If both apply, use a customer-managed key whose policy allows the user. Chunkify does not send encryption headers with S3 writes, so a bucket policy requiring those headers will reject the connection. See AWS's SSE-KMS guide.
Connect the bucket with the Chunkify dashboard
- In your Project, open Project settings → Storage and select New storage.
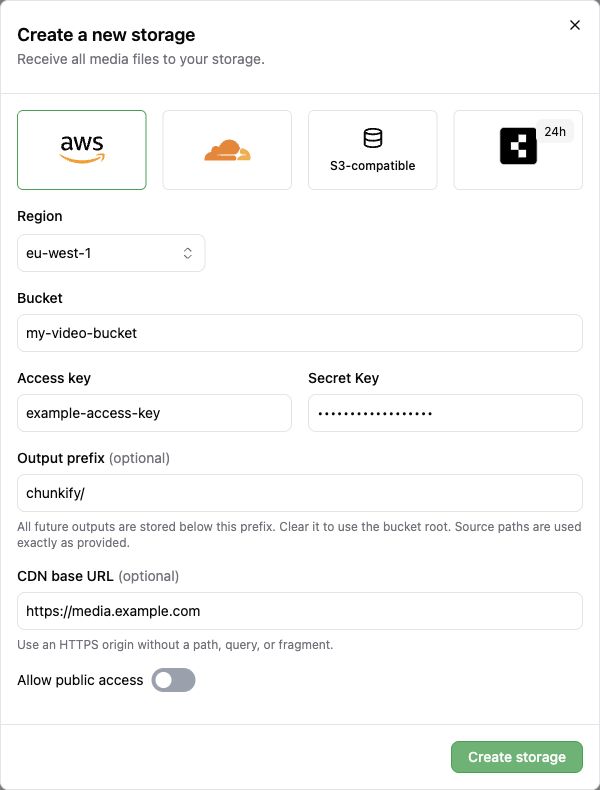
- Choose AWS S3. Enter the bucket's Region and Bucket name, then the IAM user's Access key and Secret key.
- Leave the suggested Output prefix as
chunkify/, or enter your chosen prefix. Leave Allow public access off if the bucket is private. This switch records the bucket's access setting; it does not change AWS permissions. - Select Create storage. Chunkify checks that it can write, inspect, and read an object in the output prefix. A failed check leaves the connection uncreated.
- To use this bucket for new source uploads and video outputs by default, edit the new connection, enable Use as default storage, and save.
You can set the CDN base URL now or after you configure delivery. It must be an HTTPS origin such as https://media.example.com, without a path.
Connect with an SDK
Create the connection with a Project access token. Replace the example bucket, Region, credentials, and Project ID with yours. The second call makes this the Project default for new uploads and video outputs. Omit that call if you will select this storage individually; updating the Project requires a Team access token.
import Chunkify from '@chunkify/chunkify';

const client = new Chunkify({
  projectAccessToken: 'My Project Access Token',
});

const storage = await client.storages.create({
  storage: {
    provider: 'aws',
    bucket: 'my-video-bucket',
    region: 'eu-west-1',
    access_key_id: 'My AWS Access Key ID',
    secret_access_key: 'My AWS Secret Access Key',
    base_prefix: 'chunkify/',
    public: false,
  },
});

// Optional: use this storage as the Project default.
const teamClient = new Chunkify({
  teamAccessToken: 'My Team Access Token',
});

await teamClient.projects.update('project_id', {
  storage_id: storage.id,
});
Configure delivery and browser access
CDN delivery
For ongoing playback, follow the Amazon CloudFront guide to serve this bucket through a CDN. It covers private bucket access, caching, browser access, and the CDN base URL to enter in Chunkify.
For other providers, see CDN delivery for the required URL mapping and playback checks.
If your CDN exposes the whole bucket, it can also expose source videos stored there. Keep private sources in a separate bucket or restrict what the CDN serves.
Bucket and CDN CORS
Browser uploads go directly to S3, using a signed PUT URL; they do not pass through the CDN. In the bucket's Permissions → Cross-origin resource sharing (CORS) settings, allow PUT and the Content-Type request header from each website that hosts the uploader. Include https://chunkify.dev if you upload through the Chunkify dashboard. Read the existing rules and merge them with the browser upload and playback rules before saving, since an update replaces the bucket's CORS configuration.
Playback requests go to your CDN, using GET or HEAD and sometimes a Range header. The CDN response must allow the viewing website's origin. With CloudFront, you can forward the browser's Origin header to S3 and use an S3 playback CORS rule, or add the CORS headers with a CloudFront response headers policy. If you rely on S3's rule, configure CloudFront to forward the required headers. The upload rule alone does not establish that playback works through the CDN.
Check the setup
Chunkify checks bucket access when you create the connection. To confirm the output location, create a test video asset and inspect the files under your output prefix. If you use browser uploads or CDN playback, test them from your website using the CORS guide and CDN delivery guide. The connection check alone does not verify browser access.
You can later change the Project default or edit the connection's output prefix, CDN base URL, and credentials under Project settings → Storage. Changing the prefix does not move existing files. Storage overview explains what to check before changing a connection.